
Paint on my shoes and a vague film photo? Yes, I'm an artist.
Although I'm still very much working out the best way to paint murals, a guide like this would've been helpful to me when I was first starting out. Before I begin any mural, I check my mural equipment list. I rarely need everything on this list, but it includes a lot of things outside of paint and brushes that are important to have but are often forgotten.

Design printout
I like to keep a physical printout of the mural design with me while I sketch and paint. I normally print out an A3 version and tape it to the wall, so I can reference grid points or colours quickly and without having to touch my phone.
Chalk
I use chalk to sketch out all my murals, as it can be easily painted over and wiped away with a wet rag.
Rags
Seriously can't have enough rags! It's good to have your messy rags (for wet paint brushes, paint spills, etc.) and your clean rags (for wiping away chalk on your finished mural without making smudges).
Tape measure
For measuring long distances, or setting up your grid. Make sure it fits the length of your wall.
Ruler
For measuring shorter distances. My Dad made me a custom, 120cm ruler out of a piece of wood. It has lines every 10cm and is about 5cm wide, with a handle in the middle. It's super helpful when you're sketching out the mural design in the beginning, and working close to the wall. I also draw on it with chalk a lot, especially if I have a very specific letter width or grid space that I want to repeat.
Laptop + projector
I always try to use a projector to sketch out my murals, although sometimes the space you're painting in doesn't allow for it (a narrow corridor, or outside for example) . This is important to find out early on, as I tend to make my murals more detailed if I know I can use a projector (compared to using a grid/freehand system).
Remember to bring your laptop (or whatever you're projecting from), as well as extension cables, powerboards and any relevant cables you'll need.
If I can't project my design, I generally go for the grid approach. This involves drawing a grid on a printout of my design and then drawing the same grid scaled up on the wall. I then sketch up the design as closely as possible using the grid.
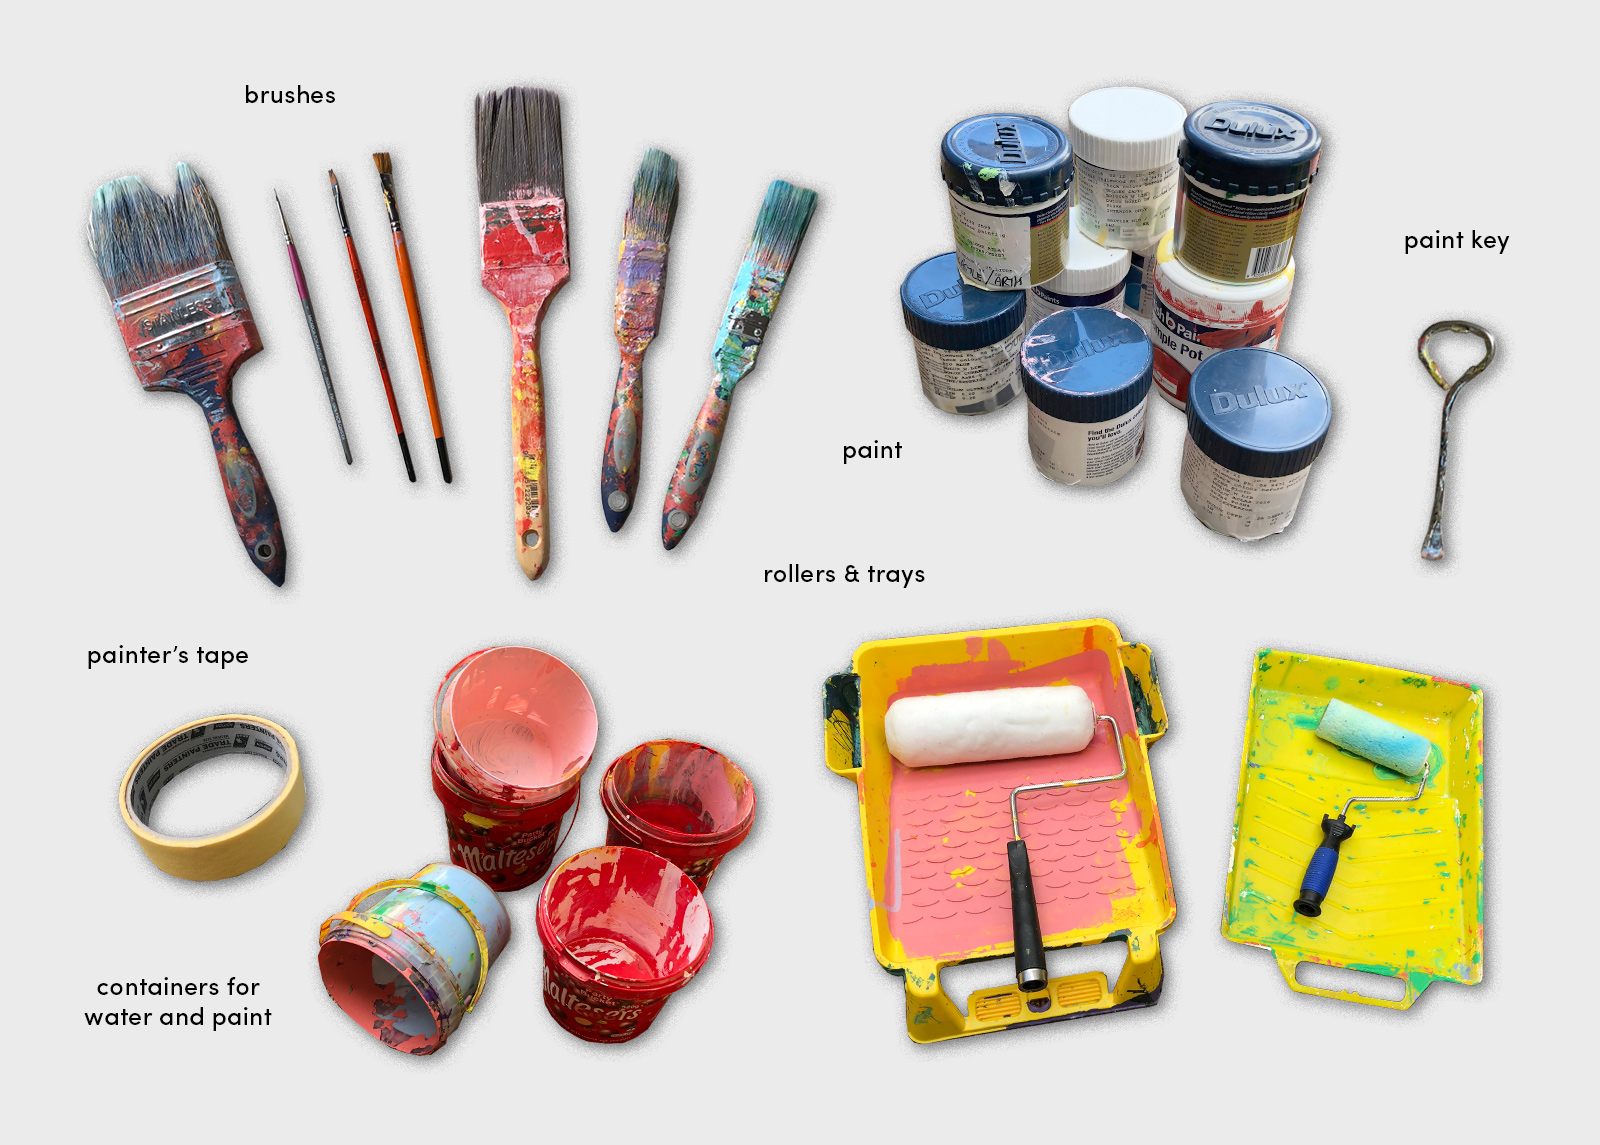
Paint
I mean, obviously, right? For outdoor murals, I'm a fan of the Dulux Weathershield brand, or any kind of super-hardy, weather-resistant brand. I generally work in large 4L tins for these, especially when painting on brick, as brick soaks up a lot of paint.
For indoor murals, I tend to stick with sample pots of interior paint (either the 0.25L or 0.5L pots and low sheen). This size pot works for me, as I never paint the whole background, and rarely paint large areas of colour. If you've got a large wall or large areas of colour though, scale up your pot size accordingly!Also yellow requires multiple coats to look nice!!! I don't know why I keep using it!!!
Paint key + mallet
If you're working with actual tins of paint, you'll need a paint key to open them, and a mallet or heavy object to seal those bad boys up!
Brushes
The main brushes I use are just basic painting brushes from an art supply store. For most jobs, I have brushes that are 10cm wide, 5cm wide, 2cm wide, 1cm wide and superfine. The 10cm and 5cm are good for filling in sections of colour, and the rest are for linework and finer details. I also prefer a square end on my brushes!
I also try to include a couple of new brushes in the materials budget for each mural, as they can get ruined pretty easily from job to job (with the way I treat them at least).
Paint rollers + trays
For those laaaarge areas of colour. I own two different sizes, so I have the right fit for each situation. Also, these are an absolute pain to wash out in the middle of a paint, or at the end of the day when your body is tired and falling apart— so be warned!
Also important is that the paint tray you're using fits the roller width. I've been caught out before with mismatched rollers and trays that don't fit and it sucks! If you're painting quite high, a paint roller extension pole is a good get too.
Rags
Seriously. Have a shit ton of rags.
Dropsheets
I use one for under the wall I'm painting, and another to keep all my pots of paint and dirty brushes on. An old bed sheet works a treat here (my Bananas in Pajamas sheet has served me well).
Painter's tape
This is great for painting super clean edges in your design or masking out the edges of your mural wall, if you're painting right to the edge. Sometimes, if a wall is kinda old, the painter's tape may peel some of the wall off— be sure to test it on a small area first!
Bin bags
For general trash and in case a paint tin explodes everywhere and you gotta contain that mess FAST.
Cling wrap
If you've got paint on a brush and don't have time to clean it, or are planning to use it later. Wrap it up real tight so it doesn't dry out all nasty.
Buckets + cups
Luckily my parents keep every kind of plastic container we've ever used, so I have plenty of handheld sized cups, containers and lids. These are great if your paint tin is super heavy and there's no way you can hold it while you paint— just pour a bit into a cup! I also fill up one container with water that I can dump all my brushes-to-be-washed into.
Water
Sometimes there's no water available on site, so it's good to have backup water just in case! Also for drinking, because please stay hydrated.
Ladder, etc.
Depending on how tall your mural is, you might just need a milk crate or a gosh dang scissor lift. Be prepared! Milk crates are great for carrying all your painting shit around, but then you can also flip them over for a seat while painting lower wall areas.

- When I go to buy my paints, I generally create swatches of every colour I'll need and add them all to my phone. I then ask to see the colour books at the hardware/paint shop, and match them up as close as possible. Remember that your screen colour is always slightly different and that paint dries DARKER. Also, don't forget to turn off night mode as this warms all the colours on your screen (I forgot to do this once and the whole mural came out a lot warmer than expected, eeek).
- I never mix my own colours! I keep a note of every colour I've purchased, and just go back to get more if needed.
- Remember to stretch and take regular breaks (especially if you're up a ladder, with your back twisted towards the wall!!!)
- I know that some people like to prime their walls but I never have. It takes extra time I don't usually have, and it's never effected the final outcome. I usually just take the wall colour as it is and begin painting. I think priming would be useful however, if you accidentally drip paint or make a mistake— you can easily over it with the background colour you laid down at the start.
- I've never had any issue with 'paint odours' or smells, although I've never used spray paint (if you use spray paint, you're probably cooler than me and know how to combat the STINK).
